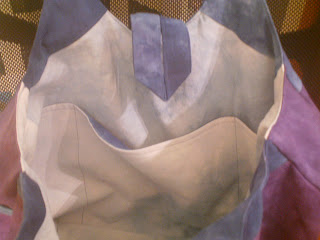
My friend, Annette, has a daughter who is a fantastic fiber artist. Kassie is a most fabulous knitter and has published some of her own patterns. So when Kassie asked me to do a special project for her, I was honored at her faith in my abilities.
Kassie has been using Hemp for her knitting and wanted a bag to put in a show featuring different uses for hemp. We traded some ideas and racked our heads over how much hemp fabric would be meeded to make a nice bag. Kassie purchased fabric and it soon arrived at my doorstep, via Annette. I looked at the hemp fabric and found an absolutely beautiful dyed, strong fabric. The weight and texture reminded me of canvas, or a very heavy linen. However, when it washed up it became very soft but kept its dense strength. I was so excited to work with this!!
Now, time for a little research. What is exactly is Hemp? I've heard all the stuff about it being made from marijuana. But a little research cleared things up. Hemp is a variation of cannibas sativa. It is the most useful plant known to mankind. In fact, cannibas sativa means useful (sativa) hemp (cannabis). Hemp is not marijuana.
Hemp can be used for clothing, fuel, food, body care, paper and fuel. Wow!! Here's a couple more things:
- The hemp plant produces the strongest natural fiber known. Hemp fabric is three times stronger than cotton fabric of the same weight; it is also warmer, more absorbent, and longer wearing.
- A crop of hemp requires no application of herbicides. With a density of 200 to 300 plants per square meter, there is no available room or light for weeds to grow.
- The hemp plant also has no need of pesticides. It has no known insect enemies and is also highly resistant to disease.
Ok, now what bag to make? It took me a LONG time to decide . . . just ask Kassie. It literally took me months to decide. There were so many factors to consider when you are making something that has to be ALL NATURAL and ORGANIC. Just to be clear . . . it's not easy being green. Sewing and quilting is really not yet geared well for organic creations. Adhesives or fusible stabilizers have so many chemicals in the glue. Certain threads, even though they may say "cotton" are wrapped in polyester. Findings, accessories, or buttons in regular stores such as JoAnn Fabrics, are not green either. They have many chemicals either in their plastics or adhesives to attach shanks or embellishments.
Fabulous book. The bag on the cover spoke to me, so that is the one I chose. I am so glad I did. Fusible woven interfacing was replaced with organic canvas to give the bag some body. It was simply basted in with the organic cotton thread I chose. I skipped the fusible fleece because I felt the weight of the canvas was enough for the bag. Had I chosen to use a fleece, there are several organic battings. There is a great brand made with bamboo and there is even a batting made from recycled plastic bottles. Both are terrific.
Then . . . sewing. There is more cutting than sewing to this bag. Cutting took longer than the sewing. I love the results. Would love your opinion.
The button? I found a wonderful crafter who makes buttons out of recycled plastic and hand dyes them. It's a gorgeous button.
I decided to just do open pockets on the inside. I know of no organic zippers. Also, I needed something sturdy so that the bottom of the bag had a fairly stable bottom. Craft weight or Peltex was out of the question. I had no idea how I was going to do this. I had to sleep on it. What I came up with was to literally STARCH pieces of fabric together. I went to my local store and found an organic corn starch. I made a thick past out of the starch and layered cut pieces of organic cotton together until I got to the texture I needed. I stuck the completed starch stack in my dryer on the shoe rack to dry. It worked. I wouldn't recommend washing the bag. It will have to be spot cleaned.
I am happy with the results. Would love to know what you think.


