Tuesday, August 13, 2013

To Goose or not To Goose

Goosetracks Embroidablock of the Month


Yep, that's right.  The one I started about a year . . . okay two years ago.  Although I have had these done for about eight months, other matters have kept me from writing my blog.  Nonetheless, an urge to share was too overwhelming.

Without further ado. . . 

My finished quilt.  I love how it shows up on the mustard colored walls of my dining room.  This quilt is made of 5" individual blocks, each embroidered and quilted in the hoop.  Let me be clear, this was TIME CONSUMING!!  However, the results are spectacular.  A dozen different fabrics, more than a dozen different threads.  The flying geese blocks around the border take approximately 40 minutes per block.  I loved the result, but hated the time it took.  

Also, this quilt was not cheap.  At approximately $20 per month for 12 months, plus the cost of your materials, plus your time.  Well, you do the math.  However, in the end it sure is a beauty.  There are lots of Oooohs and Aaaahs as people sit in my dining room, and it sure isn't because of my cooking.  

So, I wondered . . . . what if I didn't do the flying geese?  What if I didn't use all those different color fabrics?  What if I found a fabric that had movement in it and it created its own "flying" effect?  What if I only used one color of thread?  What would that result be?  

Instead of flying geese, I got a twisted ribbon effect.  It was incredible!!  How long did this one take?  The border blocks went from 40 minutes per block to about 12 minutes per block.  I finished this entire quilt in the time it took me to do about one side of border blocks in the first quilt.  

I'm not sure which one I love more.

Thursday, September 6, 2012

Professional Tote -- Tweaked Edition

I loved this tote when I first saw it at Piece by Piece and made one of these totes for my friend, Beth, for her birthday.  The pattern is called Professional Tote by The Creative Thimble.


The finished size, according to the pattern is 18" wide, 15" tall and 5" deep.  Nice size, right?  Well, when I decided to make one for myself, I took it my laptop to Piece by Piece to see if it would fit in the shop sample made by June Vandenberg.  Sorry to say, my laptop was about 1 1/2" too wide.  Bummer.  Then I thought . . . tweak the pattern dummy!!  How hard can it be to add width to a pattern?  You're a college graduate.  Make it happen!!  Duh. 

So off I went to thinking.  (It's a bit harder to do that now that college is actually 27 years behind me.   . . . 29 years behind me.  Okay, okay, okay 30 years.)  I also wanted to make sure the inside zipper pocket was tall enough to accommodate my laptop AND include protective foam as my interfacing.  Honestly, math was not my strong suit.

When doing my "tweaking" I also decided to make some simple changes to the pattern.  When I made this tote for Beth, I didn't like doing the buttonholes and cording for the side pockets.  I didn't feel you could ever find "pretty" cord locks.  Also, who the heck likes to do buttonholes.  Certainly not me.  That's more math.  So I changed the side pockets to have elastic. 

 
My finished tote is 22" wide and 18" tall.  I made no other changes to the pattern.  I liked the size of the front zippered pocket and the depth of the tote at 5".


Not only did I add width, but I had to add a bit of height to the inside zippered pocket to accommodate my laptop.  I added foam as interfacing only to the inside zippered pocket.  Let me tell you, that isn't exactly easy.  There was no way that I was going to be able to sew through six layers of fabric PLUS foam, so I decided to cut my foam to lay right up to the seam allowance.  That worked like a dream.


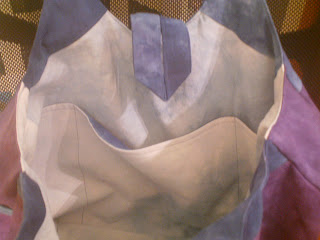
The inside of the tote is the same as the pattern, except a little length was added to the pleated and flapped pocket to make up for the expanded width of the tote.  I added the optional travel strap, key fob and identification holder to complete the tote.


It was fun and everything fits in perfectly.  Even my laptop, which I would show you, but I'm using it right now. 
 

Sunday, August 5, 2012

Amy Does it Again!! Weekender Bag

Have you ever bought a pattern and said "I'm waiting for just the right fabric to make this."?  I do that all the time.  I have patterns that are several years old that I swore I would "make it soon."  Or . . . even better, got all the fabric AND the pattern and there it sits.  I have half an entire closet full of those things, as well as a box of patterns just yearning to be made. 

However, there is one designer's patterns that I always immediately want to make and that is Amy Butler.  I have been eyeing up her Weekender Travel Bag pattern and finally purchased it when I knew I definitely had the time to make it. 

Beware -- This pattern takes LOTS of Fabric and a really huge zipper, which is sort of hard to find.  I recommend going to your local quilt shop and ask them if they can special order one for you.  This bag took a 24" non-separating zipper.  Holy cow!!

Although I LOVE Amy Butler's fabric, I found other that I thought would be incredible for this bag.  So I purchased the entire collection of Moda's Hometown.  This bag looked to me like the 1960's Pan Am style bag and I wanted fabric that said "I'm going places."  It was perfect. 


The fabric has names of every big and every small town you could possibly think of.  If you look closely by the number 4, you can see Appleton.  This bag was relatively simple and very fun to make.  The front and the back of the bag is one large pocket.  Perfect to put your plane ticket in one side and your Kindle in the other side.  The side pockets work well for a water bottle or are even deep enough to put your keys and cell phone in and they won't fall out. 

The one downfall to this pattern was the inside.  The pattern called for no inside pockets and you know a girl has to have lots of pockets in her bag.  Well, having purchased the ENTIRE LINE of fabric, I certainly had that worked out. 


I added a pleated flap pocket with two additional open slots on each side of the flap on one side.  On the other, a zippered pocket sewn on three sides so that you could also have an extra pocket behind the zippered section.  As you can see, thanks to that enormous, hard-to-find zipper, the bag opens nice and wide so you can see EVERYTHING!! 

I recently went on a weekend trip with my husband and had plenty of room for clothes for Friday through Sunday, two Kindles, an iPod, makeup bag, an extra pair of shoes (of course) and it still easily zippered closed.  Fantastic!! 

Buy the pattern . . . make the bag. 

Thursday, July 5, 2012

For The Graduates

Graduation time is upon me again.  So are graduation parties and gifts.  For the kids of my family and my close friends, I usually do those t-shirt quilts.  I nag and nag and nag for those to save those beloved t-shirts so I can hack them to bits.  Christopher, Robyn and Anna are this year's t-shirt quilt projects.  I gotta tell you . . . I'm pretty t-shirt quilted out . . .


Christopher is my brother Roland's oldest son.  He is a hockey player, so his t-shirt quilt is ALL hockey.  My brother was asked to compile a stack of t-shirts for this quilt and what he gave me was hockey jerseys.  You know . . . that meshy stuff.  I wasn't sure how this would work, but it did.  He also sent me items such as backpacks.  What I figured out was that with the right backing, it all works.  That meshy jersey stuff did well when backed with the shirtweight interfacing.  I liked making this quilt, because it wasn't your usual square after square.  I liked the randomness.


 By the way, my brother took these pictures.  We will forgive him because he is new to the quilt photographing thing.

Robyn's t-shirt quilt was very fun to make because of the colors.  Her mom got me t-shirts of all colors and I paired them with Robyn's favorite purple.  Shades of green make this one really pop.  This pattern went together fast and easy.

And then there was one more . . .

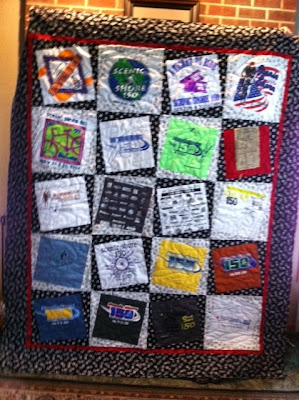
The 20th anniversary Scenic Shore 150 ride to benefit the Leukemia and Lymphoma Society is this year.  My husband, Tim does this annual ride.  Two days from Mequon, Wisconsin to Sturgeon Bay, Wisconsin.  This is a quilt I did for them to raffle for charity.  The picture isn't so great and does not do this quilt justice.  The quilting is an amazing bicycle motif.  I will try to get a better one at the ride.  We hope this makes a little more money for such a worthy cause. 

Tuesday, April 24, 2012

Morley J. Moose III


I found this pattern at Keep Me in Stitches Quilt Shop in Appleton.  I fell in love with this batik moose.  He looked so fun.  However, as I said before,  I'm not so hot at applique.  But the pieces looked big, and I thought I could do this pretty easily.

This pattern is by b.j. designs and patterns from West Des Moines, Iowa.  This fabric artist has so many amazing animal designs.  Make sure you go to her website and check it out.  I fell in love with Morley's batiks. 

To make Morley, you must trace him twice.  Once onto a large piece of stabilizer and once onto the fusible web to cut out the fabric pieces.  This went really quickly because the pieces are so large.  Unless you have stabilizer that is at least 24" wide, you will have to sew two pieces of stabilizer together to make it wide enough.  I simply put butted two pieces of stabilizer and zigzagged, just as you would with batting.

Why the stabilizer?  After all the pieces are fused onto the stabilizer, they are then satin stitched to give Morley a "stained glass" look.  If you don't use the stabilizer, you will end up with puckering.  The stabilizer prevents. this. 


 All of the inside stitches get done first, then you carefully cut Morley off the stabilizer and then placed on the background.  The background is simply 3 1/2" strips.  To quilt it, I simply did a stitch in the ditch and used the satin stitch around the trees and the wavy border for more quilting. 


This pattern indicates an intermediate skill level.  It was fast, fun and I love the way it turned out. 


Thursday, April 5, 2012

Sew Natural

My friend, Annette, has a daughter who is a fantastic fiber artist.  Kassie is a most fabulous knitter and has published some of her own patterns.  So when Kassie asked me to do a special project for her, I was honored at her faith in my abilities. 

Kassie has been using Hemp for her knitting and wanted a bag to put in a show featuring different uses for hemp.  We traded some ideas and racked our heads over how much hemp fabric would be meeded to make a nice bag.  Kassie purchased fabric and it soon arrived at my doorstep, via Annette.  I looked at the hemp fabric and found an absolutely beautiful dyed, strong fabric.  The weight and texture reminded me of canvas, or a very heavy linen.  However, when it washed up it became very soft but kept its dense strength.  I was so excited to work with this!!


Now, time for a little research.  What is exactly is Hemp?  I've heard all the stuff about it being made from marijuana.  But a little research cleared things up.  Hemp is a variation of cannibas sativa.  It is the most useful plant known to mankind.  In fact, cannibas sativa means useful (sativa) hemp (cannabis).  Hemp is not marijuana.

Hemp can be used for clothing, fuel, food, body care, paper and fuel.  Wow!!  Here's a couple more things:

  • The hemp plant produces the strongest natural fiber known. Hemp fabric is three times stronger than cotton fabric of the same weight; it is also warmer, more absorbent, and longer wearing.
  • A crop of hemp requires no application of herbicides. With a density of 200 to 300 plants per square meter, there is no available room or light for weeds to grow.
  • The hemp plant also has no need of pesticides. It has no known insect enemies and is also highly resistant to disease. 
Ok, now what bag to make?  It took me a LONG time to decide . . . just ask Kassie.  It literally took me months to decide.  There were so many factors to consider when you are making something that has to be ALL NATURAL and ORGANIC.  Just to be clear . . . it's not easy being green.  Sewing and quilting is really not yet geared well for organic creations.  Adhesives or fusible stabilizers have so many chemicals in the glue.  Certain threads, even though they may say "cotton" are wrapped in polyester.  Findings, accessories, or buttons in regular stores such as JoAnn Fabrics, are not green either.  They have many chemicals either in their plastics or adhesives to attach shanks or embellishments. 

I chose my pattern from the book called Amy Butler's Style Stitches.  Product Details
Fabulous book.  The bag on the cover spoke to me, so that is the one I chose.  I am so glad I did.  Fusible woven interfacing was replaced with organic canvas to give the bag some body.  It was simply basted in with the organic cotton thread I chose.  I skipped the fusible fleece because I felt the weight of the canvas was enough for the bag.  Had I chosen to use a fleece, there are several organic battings.  There is a great brand made with bamboo and there is even a batting made from recycled plastic bottles.  Both are terrific.

Then . . . sewing.  There is more cutting than sewing to this bag.  Cutting took longer than the sewing.  I love the results.  Would love your opinion.


The button?  I found a wonderful crafter who makes buttons out of recycled plastic and hand dyes them.  It's a gorgeous button.

I decided to just do open pockets on the inside.  I know of no organic zippers.  Also, I needed something sturdy so that the bottom of the bag had a fairly stable bottom.  Craft weight or Peltex was out of the question.  I had no idea how I was going to do this.  I had to sleep on it.  What I came up with was to literally STARCH pieces of fabric together.  I went to my local store and found an organic corn starch.  I made a thick past out of the starch and layered cut pieces of organic cotton together until I got to the texture I needed.  I stuck the completed starch stack in my dryer on the shoe rack to dry.  It worked.  I wouldn't recommend washing the bag.  It will have to be spot cleaned.


I am happy with the results.  Would love to know what you think.


Saturday, February 25, 2012

RESOLUTION CLUB

After finishing my sister's quilt, I completely neglected my blog.  I have LOTS of projects going on, but few are completed.  Time to buckle down and get some projects completed.  Easier said then done, right?  We all have so much going on in our lives.  I could list all of it, but you all know the list.

So what will I do to get those unfinished projects completed?  I joined a club at my many-times named, favorite shop, Piece By Piece called the "Resolution Club."  Joining fee is $10.  For that $10 you get one Saturday a month of uninterrupted open sewing at the shop, snacks, social time, and help and inspiration, if needed.  Upon submission of your fee, you must also submit a list of five projects to be completed by year's end.  COMPLETED.  The project, if a quilt, must be quilted and bound to be considered completed.  At the end of the year there will be a social where we will show off our finished projects and celebrate our accomplishments!! 

I sort of took the cheater's way out.  I have T-shirt quilts to complete for graduation gifts and put them on my list.  I also volunteered to do a T-shirt quilt for the 20th anniversary of the Leukemia and Lymphoma Society Scenic Shore 150 bike ride.  Tim does this ride every year and the quilt will be auctioned off with the proceeds going to the charity. 

So, here's my list:

1.  Erin's T-shirt quilt
2.  Robyn's T-shirt quilt
3.  Anna's T-shirt quilt
4.  Leukemia & Lymphoma Society T-shirt quilt
5.  Morley S. Moose wall hanging

Ok, so the last one looks like it doesn't belong, right.  EXACTLY!!  I wanted to do something completely different from the other projects and something I could complete on my own without taking it to the quilter. 

I have the top of Erin's T-shirt quilt done.  Erin is a friend of a friend who wanted a t-shirt quilt made from her college sorority t-shirts sadly hanging out in a drawer. 

Just this morning this went off the the quilter, who informed me that there are 20 quilts ahead of this one.  This pattern is out of the You Did What??? With my T-Shirt!   Great book.  Lots of ideas and patterns.  I will be making the other three t-shirt quilts from the same book.

I hope to not neglect my blog so much . . . Until next time.